Why Does Cappuccino Taste Bad, and Which Part Failed?
Bad cappuccino is easiest to fix when you taste the espresso and milk separately. That split shows whether extraction, heat, foam structure, ratio, or residue failed.
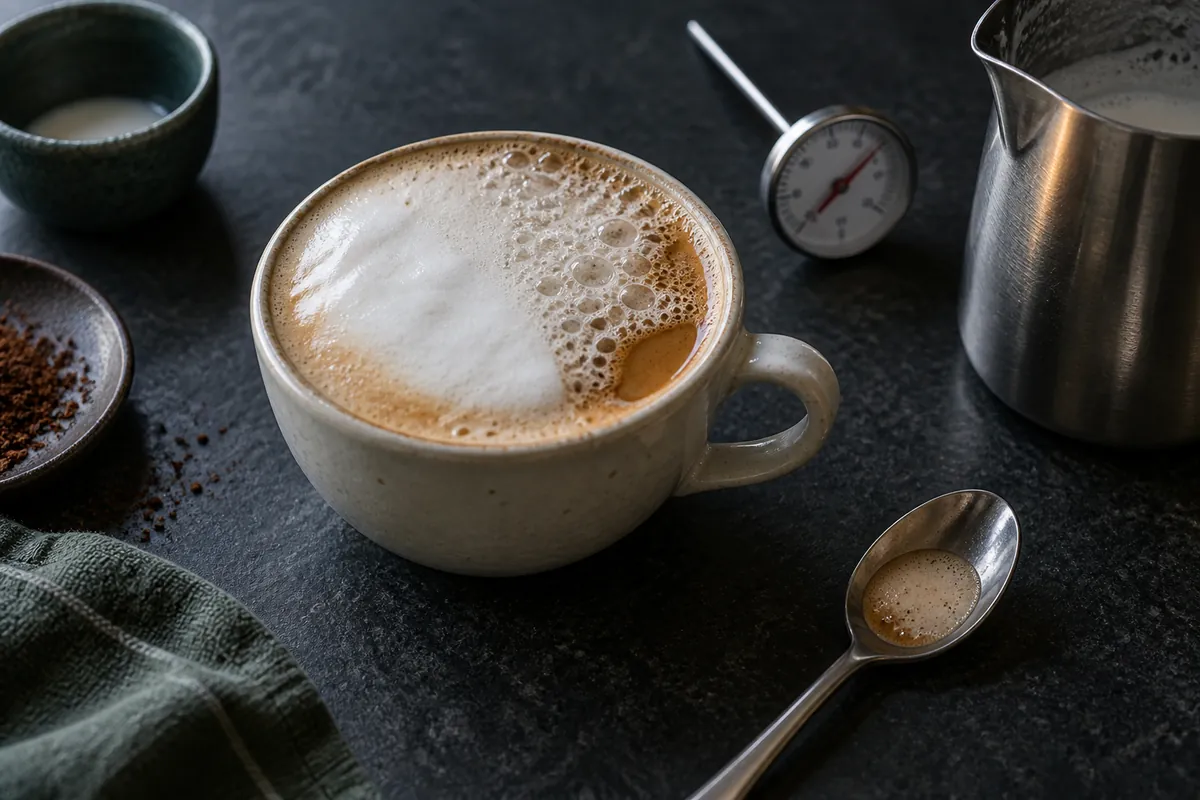
A bad cappuccino usually comes from one of five places: the espresso, the heated milk, the foam structure, the amount poured, or residue in the machine.
Taste those parts separately before changing a setting, because milk can soften a rough shot while a tall cap can make a diluted cup look correctly filled.
Bitterness, sourness, weak flavor, and dry foam do not point to one universal fix. The useful clue is what the fault tastes or looks like before assembly, how it changes as the cup cools, and whether it returns after you clean the equipment.
Taste the parts before you change anything
Pull the espresso into its own cup and take a small sip before adding milk. You are not deciding whether you love it as straight espresso.
You are checking for harsh dryness, a sharp empty finish, or an unusual stale flavor that milk may hide.
Taste a teaspoon of the steamed milk next. Properly heated milk should still taste fresh and mildly sweet, while overheated milk becomes cooked, flat, or sulfurous even when its foam looks impressive.
Once the drink is assembled, slide a clean spoon beneath the foam and taste the liquid. If the liquid is balanced but the surface feels dry or bubbly, the espresso and milk ratio are not the main fault.
- Sip the espresso alone
- Taste plain steamed milk
- Spoon beneath the foam
- Taste the assembled cup twice

The second assembled taste should happen after a few minutes. A fault that appears only as the cup cools may have been masked by heat, while a cap that breaks into dry islands points toward foam stability rather than extraction.
At a café you cannot usually request the components as laboratory samples.
You can still note whether the first sip is painfully hot, whether the foam is glossy or spoon-stiff, whether the liquid underneath tastes balanced, and whether the flavor deteriorates quickly.
This order matters because cappuccino milk sweetness can mask weak espresso while coarse foam can mute aroma. A spoon sample beneath the foam separates liquid balance from a surface texture problem, so the next change has an identifiable cause.
Why does cappuccino taste bitter, burnt, or hollow?
Start with the espresso sample. Bitterness that dries the sides of your tongue and lingers after the sip often comes from a shot that ran too slowly, extracted unevenly, or used coffee that had already lost its sweeter aromatics.
Dark roast is not automatically a defect.
A deliberately roasty espresso can still taste sweet and full in milk, while an ashy cup feels empty behind the roast and leaves a rough finish.
Read the bitter flavor before changing it
- Roasty and sweetIntentional dark-roast character may be working
- Drying and slowCheck espresso flow and evenness
- Cooked and flatCheck the milk temperature
- Ashy in every shotCheck coffee freshness and old oils
Milk brings a different kind of bitterness. Ready-to-drink milk is generally 55 to 60°C, while foam dissipates faster above 65°C.
Beyond the pleasant range, fresh sweetness gives way to a cooked taste.
Use a clean thermometer while learning rather than relying on how long your hand tolerates the pitcher. The outside of a thick pitcher lags behind the liquid, and a machine with stronger steam reaches the endpoint sooner than muscle memory expects.
A hollow cup can also start with stale grounds.
Carbon dioxide and volatile aromas fade after grinding, so an espresso may produce a crema-like surface while lacking the sweetness and aroma needed to carry through milk.
If every shot tastes ashy after a grind change and a fresh dose, inspect the coffee path. Rancid oil on the basket, portafilter, shower screen, or spout survives recipe adjustments and can make clean coffee taste old.
Do not add syrup as a diagnostic step. Sweetener can cover harshness, but it cannot tell you whether the next cappuccino needs a faster flow, lower milk temperature, fresher coffee, or clean equipment.
Why does cappuccino taste sour, sharp, or mixed?
Pleasant acidity has fruit character, sweetness, and a clean finish. A faulty sour shot tastes sharp at the front, thins out quickly, and leaves little sweetness for the milk to amplify.
A fast, pale espresso stream is one clue.
Water may have found too little resistance, so the cup contains early acids without enough of the later sweet and balancing material.
Sour and bitter at the same time deserves special attention. That combination can indicate uneven extraction: some grounds give up too little while other areas give up too much.
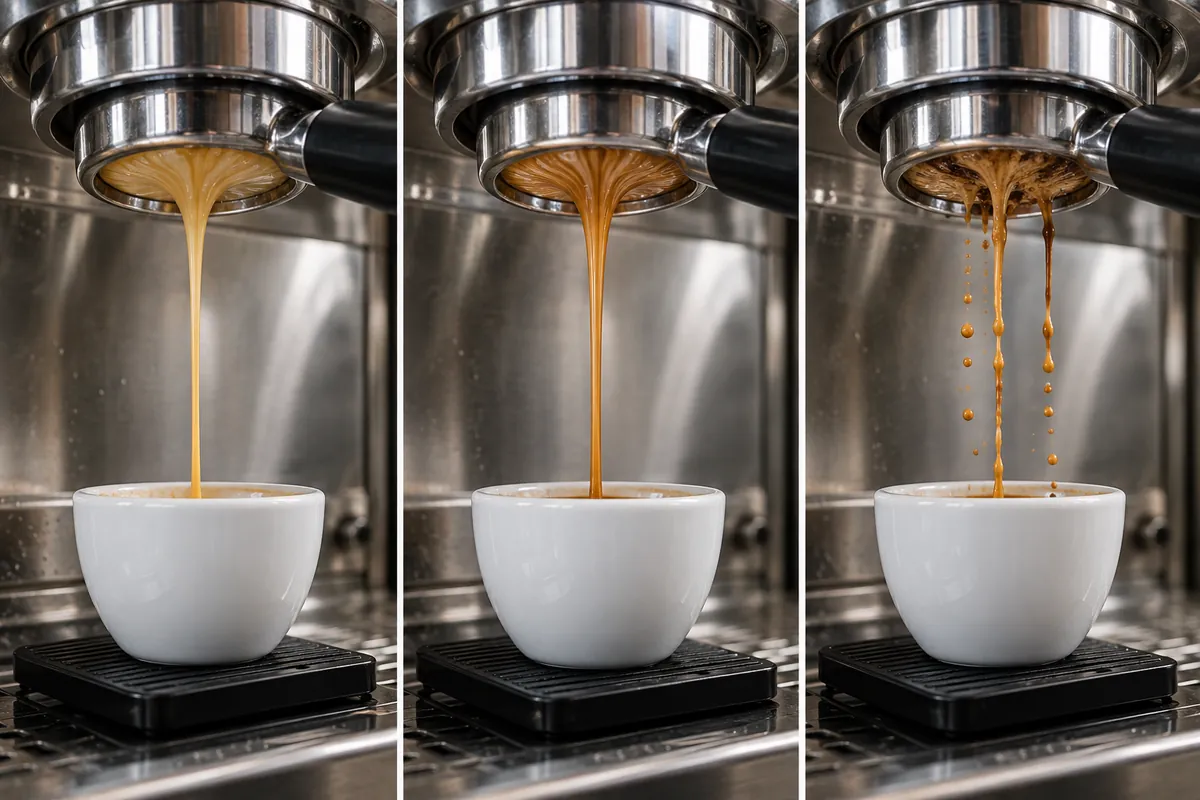
Distribute the grounds evenly, keep the puck level, and observe whether the flow becomes more cohesive. Change the grind only after you rule out channeling, because grinding finer against an uneven puck can intensify both ends of the fault.
Temperature can make a balanced cappuccino seem sharper.
A cold, heavy cup removes heat quickly, and cooler milk carries less perceived sweetness, so preheating the cup is a useful test when the espresso tastes acceptable alone.
Acidic syrups or fruit additions can also split milk and sharpen the drink. Test the cappuccino without the addition before blaming the coffee.
Fresh plant drinks can split from acid and heat, which is a different branch covered below. Dairy milk that smells normal but forms a few flakes immediately after meeting a very acidic espresso may also be an acid reaction, yet you should discard it whenever freshness is uncertain.
What makes cappuccino taste weak or watery?
Cup height is a poor measure of strength. A cappuccino can reach the rim with a tall cap while too much liquid milk dilutes the espresso below it.
Weigh the espresso and the milk you actually pour during one diagnostic cup.
You do not need to adopt a permanent formula. The weighing shows whether the cup holds much more liquid than you assumed.
The three volumes that matter
- Espresso base
- Supplies coffee concentration
- Liquid milk
- Softens espresso and can dilute it
- Integrated foam
- Changes texture and apparent volume
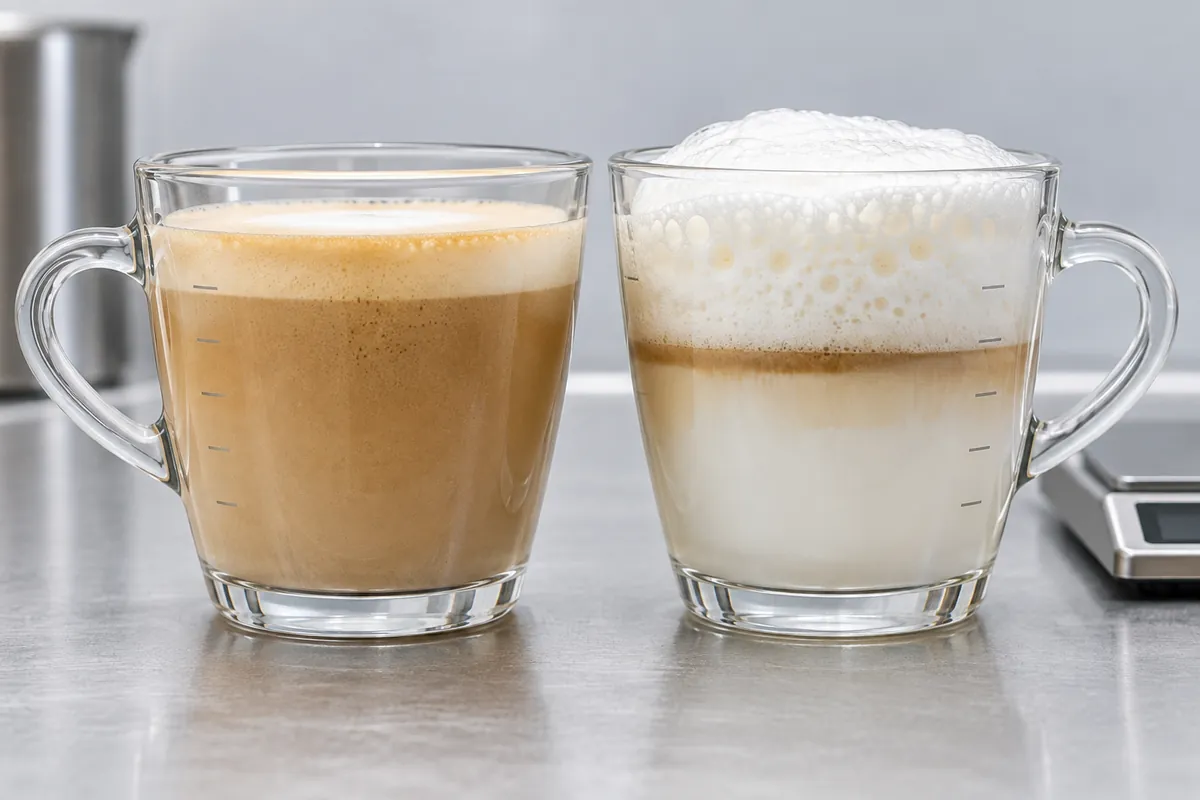
Large bubbles create a second illusion. They occupy space but do not form the dense microfoam that carries aroma and ties the espresso to the milk, so the cup feels both airy on top and thin underneath.
Purge the steam wand into the drip tray before putting it into milk.
Condensed water sitting in the wand otherwise enters the pitcher first, and a wet serving cup adds another unmeasured amount.
Serving delay matters too. Foam drains while the liquid underneath cools, so a drink left on the counter can become thinner at the bottom even though its original ratio was reasonable.
A larger modern cappuccino is not automatically watery. It can remain balanced when the espresso dose and milk texture scale with the cup, but a single small shot stretched to fill a large vessel usually cannot supply the same intensity.
If the espresso itself tastes thin and sharp, fix that first.
Reducing milk will make the weakness easier to notice rather than restoring missing extraction.
Why is cappuccino foam coarse, stiff, or dry?
Good cappuccino foam looks glossy before the pour and moves as one fluid mass when you swirl the pitcher. The surface may be deeper in a dry style, but it should not resemble bath bubbles or hold brittle peaks.
Large popping bubbles usually begin when the steam tip rides too high. Loud ripping bursts mean air is entering in uncontrolled pockets instead of being folded into the milk.
Thin hot milk comes from the opposite position. A deeply submerged tip heats the milk without adding enough early air, leaving little structure for the cappuccino cap.
| Surface | Likely cause | Next test |
|---|---|---|
| Glossy fine foam | Controlled early air and a rolling vortex | Stop changing the technique |
| Large popping bubbles | Tip too high or air added too long | Lower the tip and shorten stretching |
| Stiff spoonable cap | Excess stretching with poor integration | Add less air and keep the milk moving |
| Hot thin milk | Tip submerged before enough air enters | Introduce air near the start |
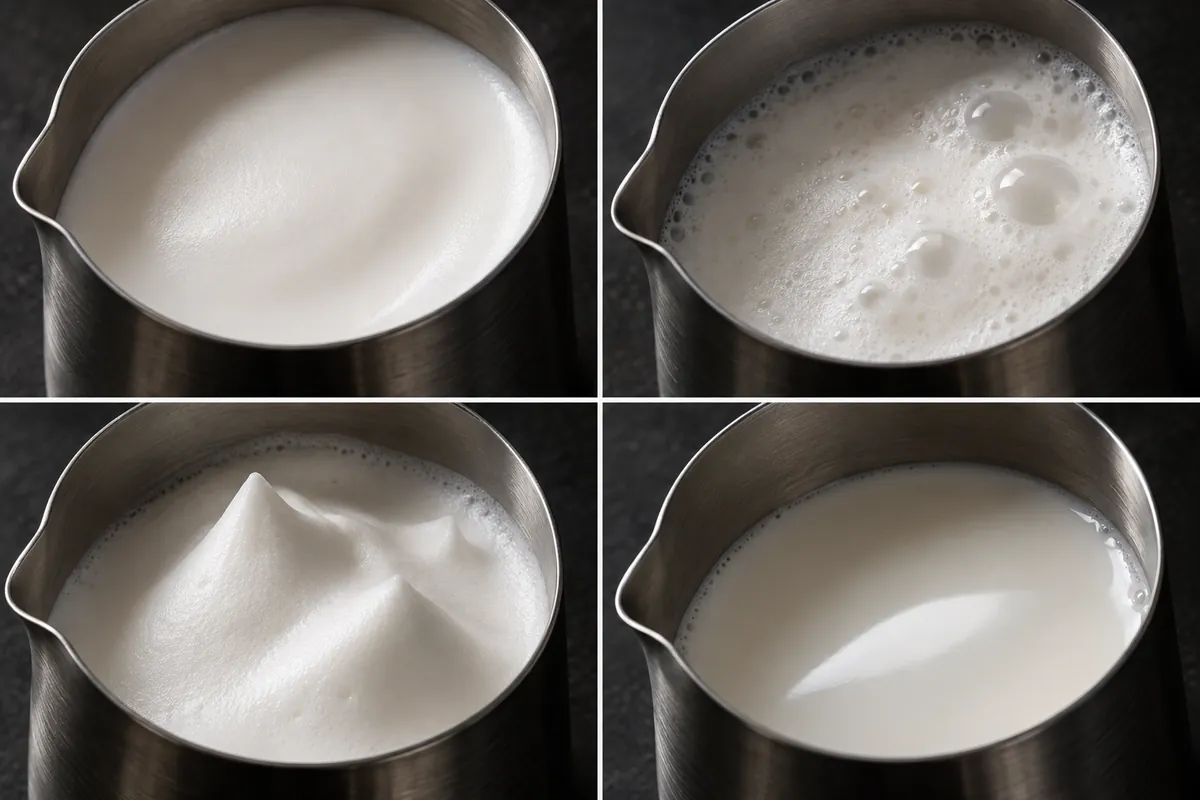
Use two linked steaming phases: introduce a controlled amount of air near the start, then maintain a whirlpool that rolls larger bubbles back through the liquid.
The vortex is not decorative movement. It distributes heat and refines the bubbles before their films set.
Pitcher volume changes the geometry.
Too little milk may sit below the tip's usable range, while an overfilled pitcher leaves no room for expansion and makes a strong vortex hard to establish.
Tap the pitcher only to remove a few remaining surface bubbles, then swirl to keep milk and foam integrated. Repeated hard banging cannot turn a field of coarse bubbles into microfoam because the problem exists throughout the pitcher.
A dry cappuccino is a legitimate style, not permission for rough foam.
More foam should still feel moist, fine-bubbled, and connected to the liquid beneath it.
Why does cappuccino foam collapse after pouring?
Foam begins changing the moment steaming stops. Liquid drains downward through the network, the films around bubbles become thinner, and gas moves from smaller bubbles into larger ones.
Milk proteins form and stabilise the films around each bubble. Protein behaviour, fat, temperature, and processing all affect how long that network resists drainage and coarsening.
How a weak cappuccino cap separates
- Uneven bubbles formLarge and small bubbles begin with unequal films
- Liquid drainsGravity pulls moisture toward the cup
- Bubbles coarsenLarger bubbles grow while smaller ones disappear
- The cap separatesDry islands remain over thinner liquid

Some settling is normal.
The fault is speed and severity: a cap that becomes matte islands over thin liquid within a minute started with less stability than one that remains integrated through normal drinking time.
Excess heat accelerates the loss. It changes milk proteins and removes the margin between a glossy pour and a dry cap, which is another reason to stop steaming at a measured endpoint.
Time is the easiest variable to control.
Swirl the pitcher after steaming, pour promptly, and serve the cappuccino instead of letting it wait while you clean or prepare another drink.
Detergent, oil, or milk residue can also weaken films. Use a clean pitcher and cup, wipe and purge the wand after each use, and rinse away cleaner according to the manufacturer's instructions.
Rough pouring can break a marginal foam, but it rarely creates the instability by itself. If the pitcher already contains separated liquid and a stiff raft, pouring more gently will only preserve a bad structure for slightly longer.
What changes when plant milk makes cappuccino taste bad?
Plant drinks do not share one milk-like behavior. Their proteins, fats, carbohydrates, and stabilizers vary by ingredient and brand, so the same steam position can produce glossy oat foam, weak almond foam, or a split soy drink.
Changing products can therefore be a legitimate troubleshooting test when the same technique gives a weak or split result.
| Result | What it suggests | First controlled test |
|---|---|---|
| Thin foam | Limited structure or insufficient air | Try a barista formulation with the same technique |
| Visible splitting | Acid and heat stress | Lower milk heat before changing espresso |
| Cereal or bean flavor | Product and coffee conflict | Taste the heated drink alone |
| Excess sweetness | Formulation overwhelms espresso | Try an unsweetened compatible product |
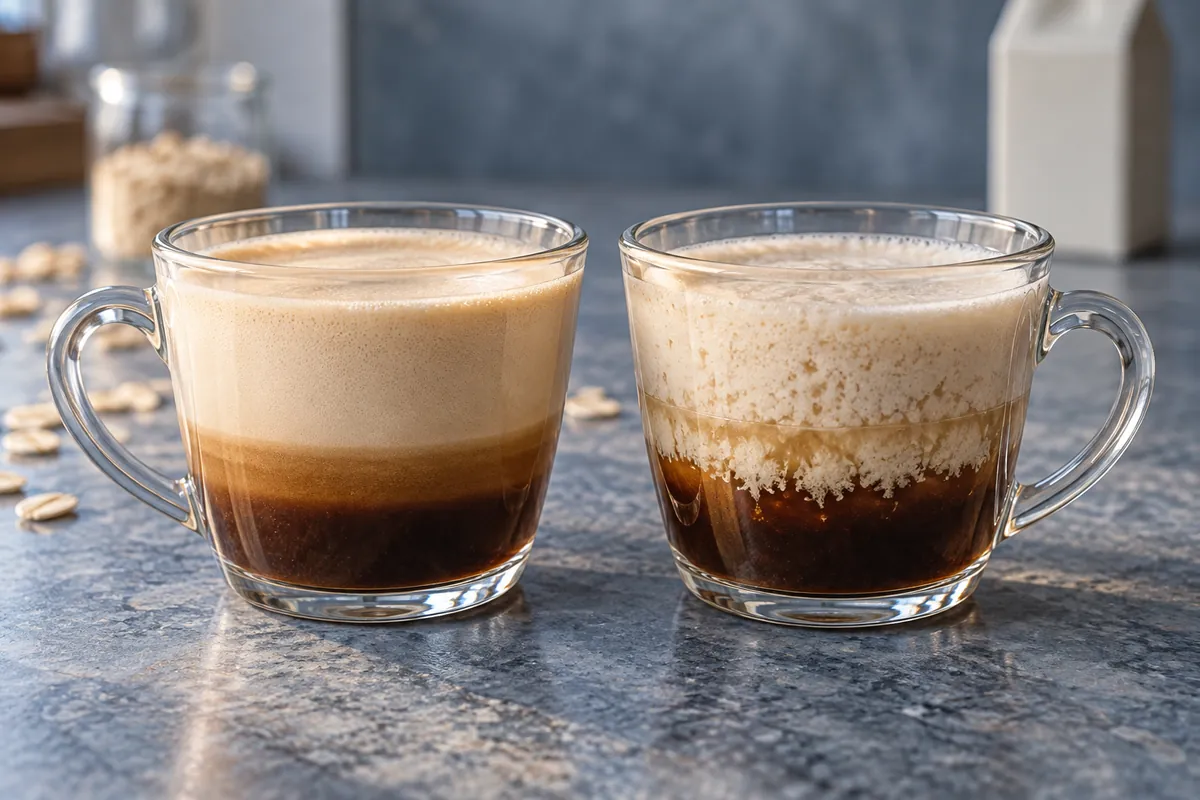
Barista-labelled products usually contain a formulation designed for heating and foaming, but the label is not a universal standard. Two cartons with similar fronts can use different protein levels, oils, buffers, and stabilizers.
Start cooler than you would with dairy and stop when the texture and sweetness are right. Higher heat may exaggerate cereal flavors and can push a marginal formula toward separation.
Then test the coffee side. A very bright espresso creates a harsher acid challenge than a lower-acid roast, so changing the bean may solve repeated splitting even when the plant drink is fresh.
Do not confuse acid splitting with spoilage.
Fine feathering that appears only on contact with hot espresso suggests an interaction, while off odor, swollen packaging, slime, or abnormal flavor still requires disposal.
When is the machine causing the bad cappuccino?
Suspect the machine when the same fault survives fresh coffee, fresh milk, and a controlled technique change. Persistence is stronger evidence than one bad shot because it points to a shared surface, water path, or steam behavior.
Coffee oils collect on the basket, portafilter, spouts, and shower screen.
As they oxidize, they add an old, bitter flavor to every espresso that milk cannot fully hide.
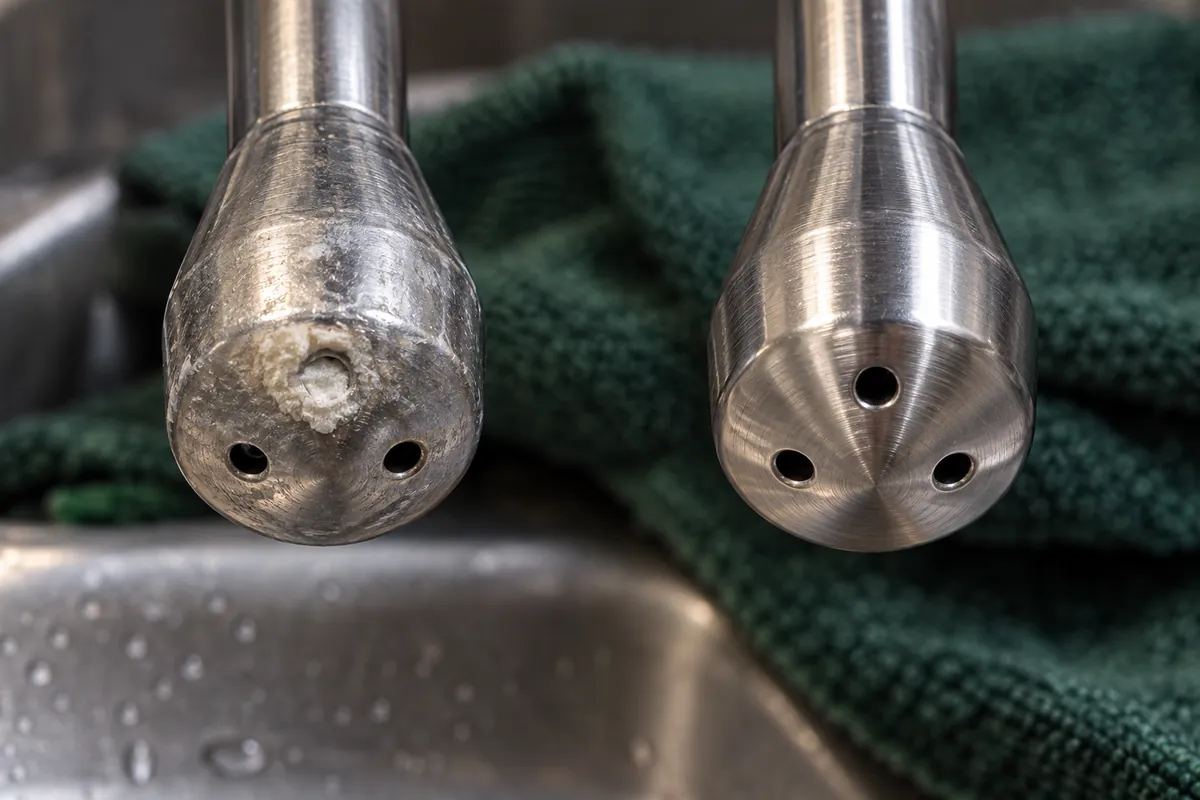
A blocked steam hole creates a different repeatable pattern. The jets no longer push evenly, so the pitcher refuses to form the rolling vortex you can produce on a clean machine.
Portafilter and screen
Remove loose grounds and clean coffee oils using the maker's approved method.
Steam-tip holes
Let the tip cool, wipe it, and clear only as the manufacturer directs.
Wand and cup water
Purge condensation and dry the serving cup before measuring.
Pressure and temperature
Seek service when instability remains after cleaning and correct setup.
Weak steam may be normal while a small boiler recovers, especially after brewing. If performance returns after the manufacturer-specified recovery time, adjust workflow rather than opening the machine.
Temperature swings that continue through warm-up, cleaning, and fresh water deserve a manual check or professional service. Do not adjust internal pressure, electrical parts, or boiler controls as a cappuccino experiment.
Water can introduce flavor too.
Test plain hot water after cooling it to a safe tasting temperature.
A metallic, stale, or chemical note that appears without coffee belongs to the water path or supply.
Clean first, then repeat the same espresso and milk test. A grind change made on top of rancid oils or asymmetric steam produces new numbers but does not remove the actual cause.
Can you rescue a cappuccino that already tastes bad?
A finished cup has limited options because extraction and heating cannot be reversed. Rescue makes sense only when the ingredients are fresh and the fault is a small imbalance or a texture preference.
| Current fault | Honest action | Limit |
|---|---|---|
| Slightly too strong | Add a small amount of compatible hot milk | The drink becomes wetter |
| Dry cap over balanced liquid | Stir gently to integrate the cap | The original layered texture is gone |
| Burnt or severely extracted | Remake it | Sweetener only conceals the fault |
| Off milk or rancid residue | Discard, then clean | Do not taste further |
If the liquid beneath the cap tastes good, stirring is reasonable.
It changes a dry cappuccino into a wetter, more integrated drink, but it preserves a cup you may still enjoy.
A slightly intense cup can accept a spoonful or two of hot milk. Add gradually, because pouring a large amount turns a correctable balance issue into a watery one.
Burnt milk cannot be cooled back into sweetness. Severely sour, bitter, or channelled espresso also remains flawed after assembly, and extra milk merely increases the volume of the compromise.
Never rescue milk with spoilage signs.
Discard the cup, wash the pitcher and utensils, and clean any machine surface the milk touched before preparing another drink.
Sweetener is a preference, not a repair. If you enjoy the cup after adding it, that is a valid serving choice, but the result supplies no evidence for fixing the next cappuccino.
How should you change the next cappuccino without guessing?
Return to the component that failed in the first tasting pass.
An espresso fault earns an espresso variable, a milk flavor fault earns a temperature variable, a foam fault earns an air or vortex variable, and a persistent fault earns cleaning.
- Name the failed componentEspresso, milk, foam, assembly, or machine
- Choose one variableGrind, yield, milk endpoint, air time, poured mass, or cleaning
- Hold the rest steadyUse the same beans, dose, milk, cup, and workflow
- Record the resultNote flow, beverage mass, milk finish, and the taste change
- Repeat or escalateKeep a useful change, reverse a worse one, or seek service
Changing grind, dose, yield, milk temperature, air, and ratio together destroys the evidence. Even an improved cup cannot tell you which action worked, so you cannot reproduce it confidently.
Record enough to compare, not enough to turn breakfast into paperwork. Shot yield, approximate flow time, milk temperature, poured milk mass, visible foam state, and one plain sensory note usually preserve the decision.
Use the same coffee and milk while testing.
Freshness, a new roast, or a different plant-drink batch can reset cappuccino behavior and make yesterday's successful setting misleading.
When the next cup improves, repeat it once before changing anything else. A second similar result separates a durable correction from luck in puck preparation or steaming.
When it does not improve, reverse the change and move to the next plausible cause. A controlled failure is useful because it removes one cause from the list.
Stop adjusting when the fault remains across fresh ingredients, clean equipment, stable measurements, and repeated technique. That is the point for the machine manual, manufacturer support, or a technician, not a more elaborate cappuccino guess.
Common questions
Is cappuccino supposed to taste bitter?
A dark espresso can taste roasty, but the finished cup should still have sweetness and body. Harsh dryness, ash, or bitterness that remains in the espresso sample points to extraction, stale coffee, or old oils.
Why does cappuccino taste worse as it cools?
Heat can mask sharp or bitter flavors, while foam drains and larger bubbles grow during the wait. Taste the espresso and milk separately, then compare the assembled cup when hot and after a few minutes.
Why does a home cappuccino taste mostly like milk?
The usual causes are weak espresso, too much liquid milk, or a tall cap made from coarse bubbles. Weigh the espresso and poured milk once, then judge strength from the liquid rather than the cup height.