How to Make a Cappuccino
A cappuccino needs espresso, liquid milk, and fine mobile foam in the same sip. Cup size, early aeration, rolling, and immediate pouring create that balance.

To make a cappuccino, combine one balanced espresso with steamed milk that contains enough integrated microfoam to fill a small 150 to 180 ml cup. The drink should taste clearly of coffee, feel airy at the surface, and remain liquid beneath the foam rather than dividing into hot milk under a dry cap.
The familiar equal-thirds description is a useful picture, not a reason to measure foam with a ruler. Espresso, liquid milk, and fine foam must arrive as one pour, with enough aeration to distinguish the drink from a latte.
Set the espresso, milk, and cup together
Begin with the final cup rather than an oversized pitcher. A small cappuccino needs one espresso, roughly 100 to 120 ml of cold milk before steaming, and room for that milk to expand as air is introduced.
Cappuccino starting build
- Espresso
- 1 double shot, commonly 36 to 45 g
- Cold milk
- About 100 to 120 ml before steaming
- Final cup
- 150 to 180 ml
- Milk texture
- Glossy microfoam with a thicker foam layer than a latte
- Serving temperature
- Warm enough to be sweet and aromatic, not scalding
- Classic shorthand
- Espresso, steamed milk, and foam in roughly equal visible parts
The espresso should be balanced before milk is added. A sour shot can taste sharper beside milk, while an excessively bitter shot needs so much milk to soften it that the result moves toward a latte.
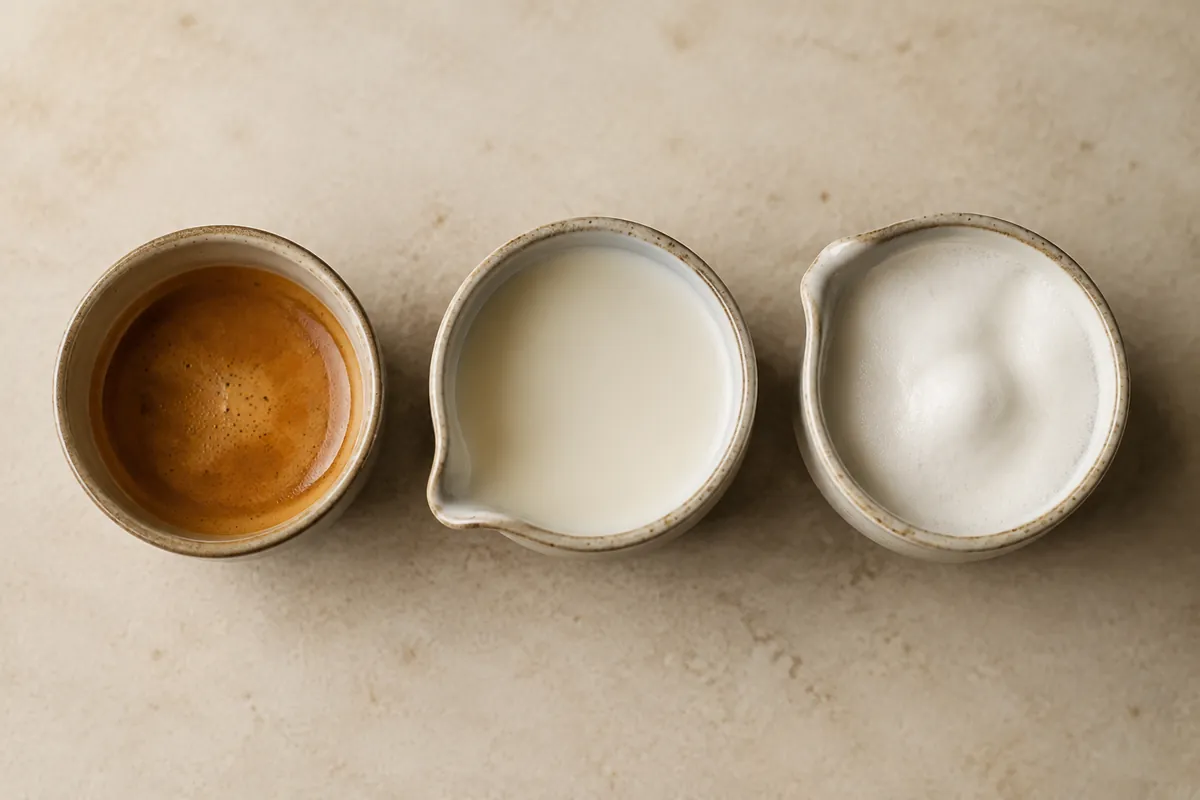
Use cup size to protect the ratio. A single shot poured into a large mug invites extra milk, and extra milk changes both coffee intensity and the amount of foam needed to keep the drink recognizable.
Prepare the espresso before steaming milk
Have the coffee dosed and the portafilter ready before opening the steam valve. Espresso can wait briefly while milk finishes, but textured milk begins separating into liquid and foam as soon as the pitcher stops moving.
- Warm the cappuccino cup, then dry it before pulling the shot.
- Purge retained water from the steam wand into the drip tray.
- Fill a cold pitcher only to the start of its spout or another safe expansion point.
- Keep a clean damp cloth ready for wiping the wand immediately after steaming.
- Pull a balanced espresso without extending the shot to fill the cup.
Steam after the espresso is underway or complete, depending on what your machine can do reliably.
The goal is to pour the milk within seconds of finishing it, not to race two processes and lose control of both.
Old milk residue blocks steam holes and adds stale flavor. Purging before use clears condensed water, while wiping and purging immediately afterward prevents milk from drying onto or inside the tip.
Cold milk provides more time to introduce and integrate air before the target temperature is reached. A cold pitcher helps too, although starting volume and wand power matter more than chasing one precise pitcher temperature.
Use enough milk for the wand tip to remain submerged once rolling begins, but leave expansion room. Overfilling makes a vortex difficult and wastes milk; underfilling exposes the tip and creates coarse bubbles before you can correct it.
Stretch the milk, then roll it smooth
Place the steam tip just below the surface near the side of the pitcher. Introduce air early with a soft paper-tearing sound, then raise the pitcher slightly so the tip remains submerged and the milk rolls in a vortex.
How to steam cappuccino milk
- PositionSet the tip just under the surface and off center so the milk can rotate
- StretchIntroduce air during the early, cool phase until the milk volume has visibly expanded
- RollSubmerge the tip slightly and keep a controlled vortex that folds bubbles into the liquid
- StopFinish before the pitcher becomes too hot to control comfortably or the milk loses sweetness
- CleanClose the steam valve, wipe the wand at once, then purge it briefly
- PolishTap out any large surface bubbles and swirl until the milk looks glossy and uniform
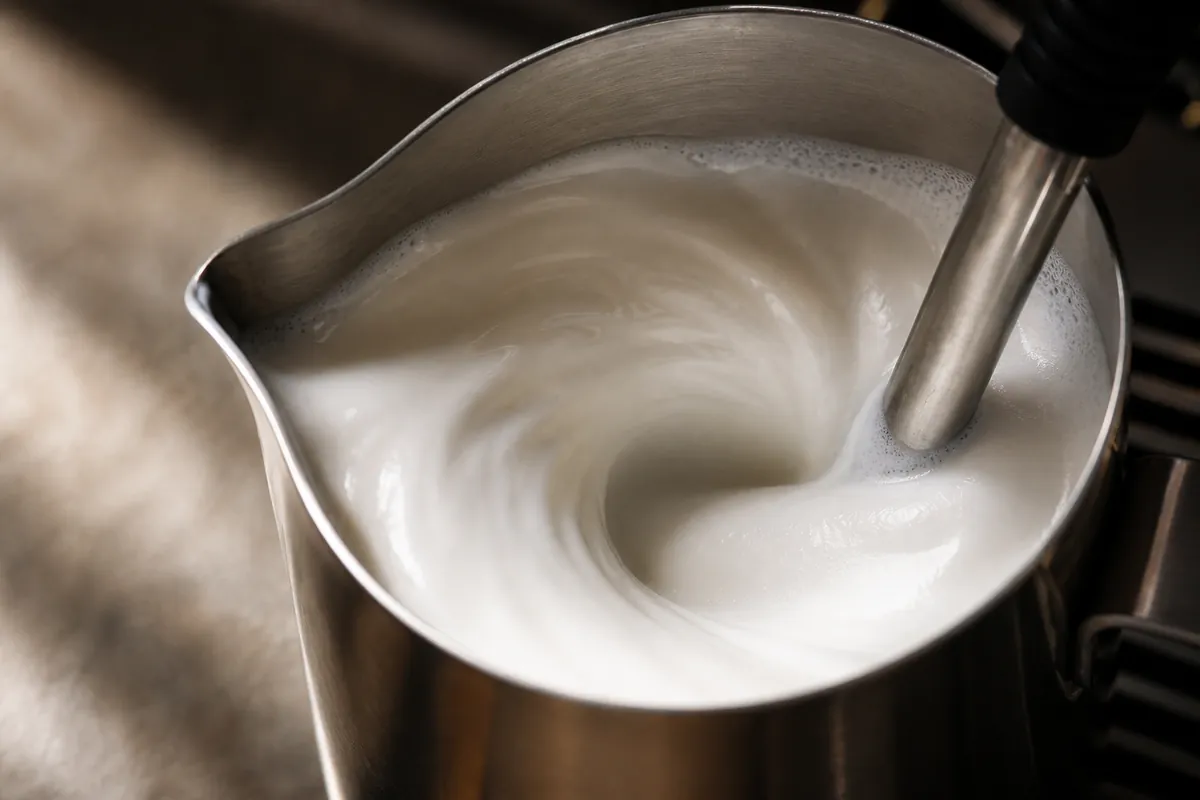
Large bubbles come from pulling the tip too far above the surface, while a buried tip adds heat without useful air.
Add air early, then integrate it during the rolling phase.
The finished pitcher should resemble wet paint when swirled, with no stiff spoonable island floating above thin milk. Cappuccino foam is more abundant than latte foam, but it should still be made of small bubbles that move with the liquid.
Milk sweetness becomes more apparent as it warms, then cooked flavors emerge when heating continues too far. A thermometer can teach the machine's pace, but the goal is a repeatable sensory range rather than maximum heat.
Protein helps form films around air bubbles, while fat affects richness and how those films behave. Two milks at the same temperature can therefore expand differently, and technique learned on one product may need adjustment on another.
The rolling vortex pulls larger surface bubbles back into the liquid, breaks them into smaller bubbles, and distributes heat. Without that circulation, the bottom can warm far ahead of the top while coarse foam remains stranded above it.
Plant drinks vary in protein, fat, stabilizers, and acidity, so they do not all hold the same microfoam. A barista-formulated oat or soy drink is usually easier to texture, and plant milk curdling explains why heat and acidic coffee can break a stable-looking pour.
Pour before the foam separates
Swirl the espresso once if its crema has separated into a patchy surface, then swirl the pitcher until milk and foam move together. Begin the pour from a little height to carry milk below the surface, then move closer as the cup fills so microfoam can settle across the top.

You do not need elaborate latte art to make a sound cappuccino.
A glossy continuous pour matters more than a pattern, because it shows the foam remained integrated instead of being spooned onto a pool of hot milk.
Hold the pitcher by the handle and use a controlled tilt rather than shaking foam loose. If glossy milk does not approach the spout as one mass, swirl again before pouring instead of scraping the surface with a spoon.
The early pour sets beverage balance because liquid milk enters first. The late pour sets surface texture, so slowing and lowering the spout near the end can place foam without building a rigid mound.
What the pour should build
- BaseEspresso supplies concentrated flavor and aroma
- IntegrationThe first milk enters beneath the surface and softens the shot
- LiftThe closer pour carries more microfoam into the upper part of the cup
- CapA fine elastic foam layer remains above a drinkable liquid body
Do not hold back all the foam until the end. That technique creates separate milk and foam zones, so the first sip is dry and airy while the last tastes like a small latte.
Pour during the glossy, integrated window.
Every pause gives buoyant bubbles time to rise away from the liquid they should accompany.
Correct wet, dry, bubbly, or flat results
Read the surface and the first sip together:
- Large isolated bubbles point to air introduced too high or too late.
- A stiff cap over thin milk means the foam separated before pouring.
- A flat, latte-like surface means too little air entered during stretching.
- A coarse, dry mouthfeel usually follows overheating or stationary foam.
- Sweet, glossy milk with fine bubbles indicates the rolling phase worked.
A wet cappuccino has too little air and resembles a small latte. A dry cappuccino has a thick, rigid foam cap and too little liquid milk, while a bubbly one carries visible soap-like bubbles that collapse quickly.
| Result | Likely cause | Better next move |
|---|---|---|
| Wet and latte-like | Too little air during the early phase | Keep the tip near the surface slightly longer while the milk is cool |
| Dry foam cap | Too much air or foam spooned on at the end | Introduce less air and extend the rolling phase |
| Large bubbles | Steam tip repeatedly broke far above the surface | Keep the tip barely at the surface with a steady tearing sound |
| Flat hot milk | Tip stayed too deep throughout steaming | Begin closer to the surface, then submerge after expansion |
| Foam separates in pitcher | Milk waited without swirling | Swirl continuously and pour immediately |
| Coffee disappears | Cup or milk volume is too large | Return to a smaller cup or use a stronger balanced espresso dose |
If foam is coarse, fix technique before changing milk brands. If the same method works with dairy but repeatedly fails with one plant drink, compare ingredient labels and use a formulation intended for steaming.
A screeching sound usually means the steam tip is too deep or milk is not circulating around it. A violent gulping sound points the other way, with the tip repeatedly breaking above the surface and pulling large pockets of air.
When milk becomes hot before enough foam forms, the introduction phase ended too soon. Starting closer to the surface on the next attempt is more useful than reheating the finished milk, which cooks it further without rebuilding integrated foam.
When the pitcher expands dramatically but pours as separate froth and liquid, too much air entered and too little rolling followed. Reduce stretching time, preserve the vortex longer, and pour a smaller cup rather than spooning excess foam on top.
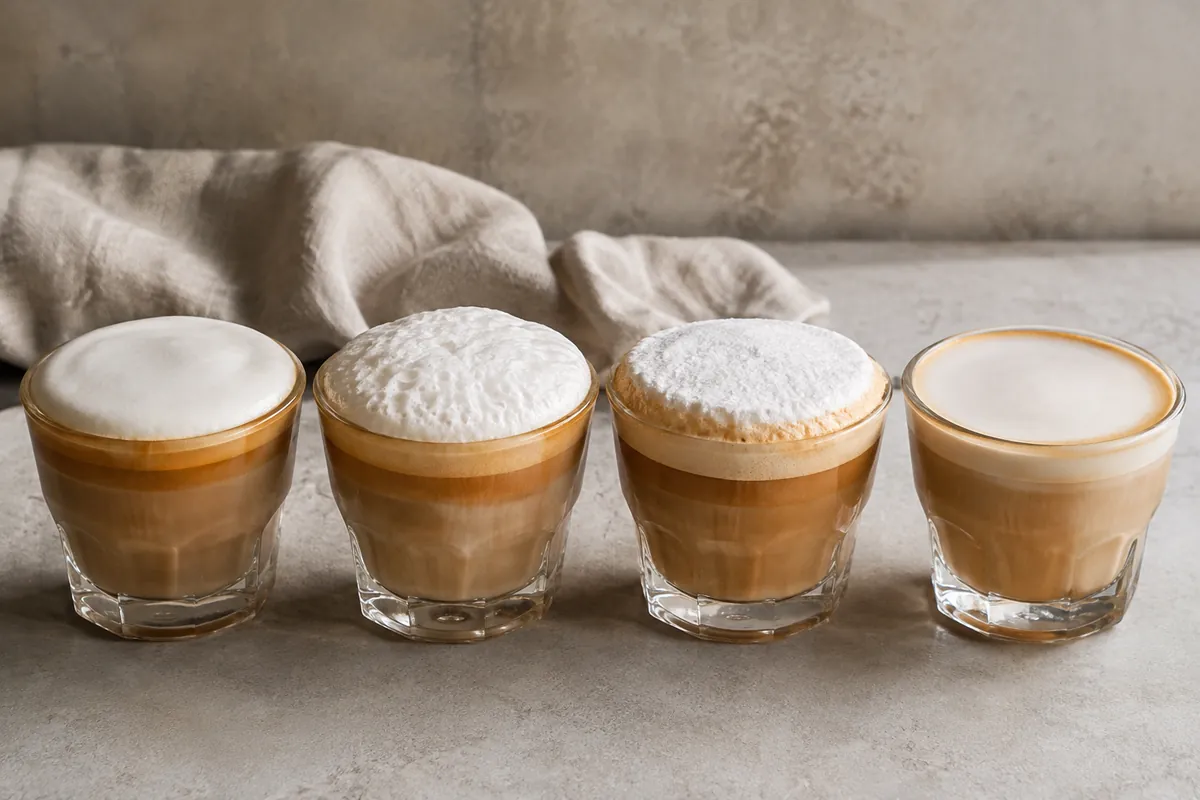
Texture is visible process evidence of how air entered and moved.
The milk frother guide can help distinguish tools, while the cappuccino profile explains wet, dry, and café-size naming in more detail.
Make a cappuccino without a steam wand
Use concentrated coffee rather than a full mug. Moka pot coffee or an AeroPress concentrate gives milk enough coffee flavor to work with, although neither reproduces espresso's texture or crema.
Warm milk in a saucepan without boiling it, then aerate it with an electric milk frother or a clean French press. A handheld whisk can make foam, but its large, uneven bubbles separate faster and should be folded back into the milk before pouring.
Electric frother
The easiest route to repeatable foam, especially when it heats and aerates separately.
French press
Pump warm milk carefully until volume expands, then swirl to integrate bubbles.
Handheld wand
Work near the surface first, then deeper to circulate the milk.
Sealed jar
Produces coarse foam and creates pressure when hot, so shake milk before heating rather than sealing hot milk.
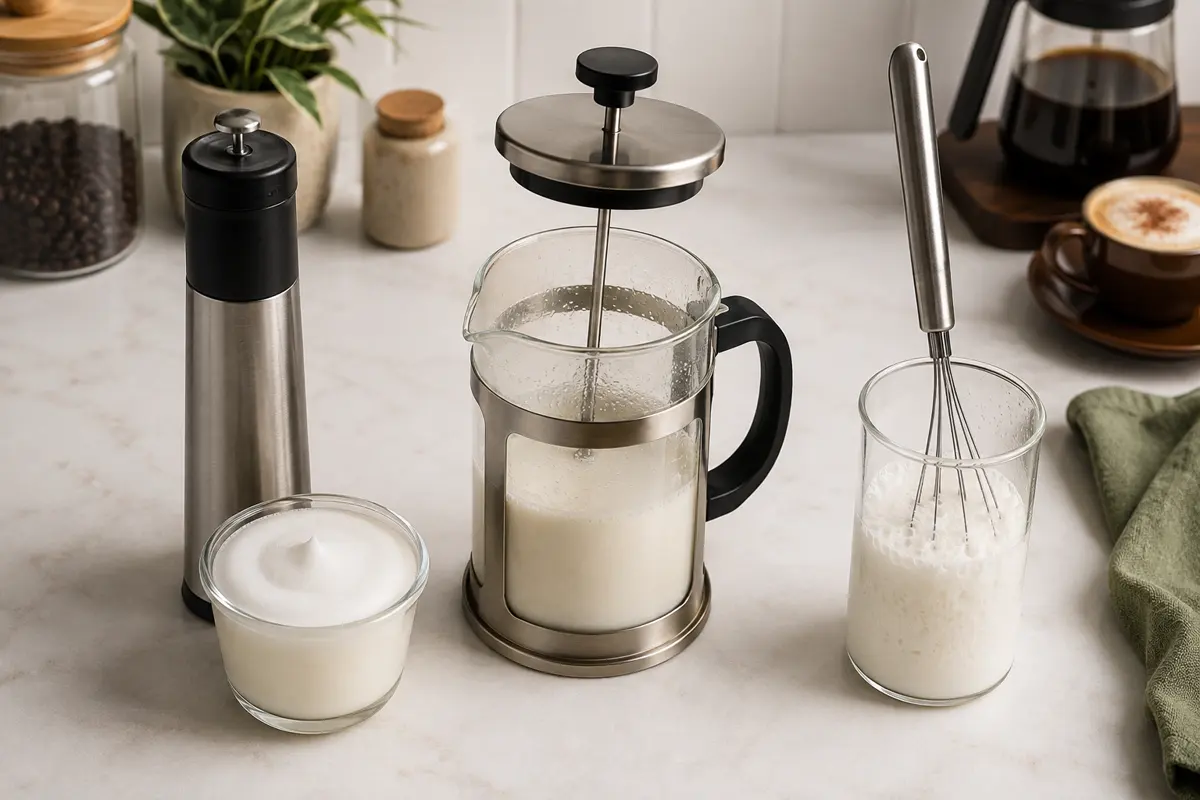
The tools create different bubble sizes because they move air through milk differently. Judge the foam by mobility and sheen, then swirl or fold it before pouring instead of treating height as proof of quality.
Pour the warm liquid milk into the concentrated coffee first, then guide integrated foam across the surface. Spoon only enough foam to finish the cap if the tool separates it, since a bowlful of dry froth does not compensate for weak coffee underneath.
French-press frothing works best when the vessel is not overfilled and the screen remains below the surface during pumping. It makes more separated foam than a steam wand, so swirling and a careful pour become especially important.
An automatic frother may offer cappuccino and latte settings that differ mainly in foam volume. Use the smaller, foam-forward program as a baseline, then judge the finished cup instead of assuming the label matches your cup size and espresso dose.
A no-machine cappuccino is an approximation with the same balance goal.
Be accurate about the base, keep the cup small, and aim for fine mobile foam rather than copying the height of a dry café cap.
Serve it while aroma and foam are aligned
Set the cup down as soon as it is poured.
Fine foam will hold longer than large bubbles, but every cappuccino gradually separates as liquid drains from the bubble walls.

The contrast is easiest to see at the rim: fresh microfoam remains moist and continuous, while older foam becomes drier and more uneven as liquid drains below it. Serving promptly preserves integration, not merely temperature.
A light dusting of cocoa may be familiar in some cafés, but it is optional and should not be used to hide scorched milk or a rough shot. Sugar is also optional and is easiest to dissolve in the espresso before the milk arrives.
The finished drink should offer coffee, warm milk, and foam in each early sip. A small, balanced, integrated cup lets coffee, milk, and foam arrive together.
Cappuccino method
- Makes
- 1 small cappuccino, about 150 to 180 ml
- Water temp
- Milk about 55 to 65 C / 131 to 149 F
- Total time
- 5 min
What you need
- 1 espresso, about 25 to 30 ml
- 100 to 120 ml cold milk
Equipment
- Espresso maker
- Small cappuccino cup
- Milk pitcher and steam wand or frother
Method
- PreparePreheat the small cup and pull the espresso.
- StretchAdd air near the milk surface early.
- RollSubmerge the tip slightly and create a glossy whirlpool.
- PolishTap and swirl the pitcher if needed.
- PourPour immediately so milk and fine foam enter together.
Common questions
How much milk goes into a cappuccino?
Use a small cup and enough textured milk to balance one espresso without burying it. The equal-thirds rule describes the finished structure, not three separately measured layers.
Why is cappuccino foam bubbly?
Large bubbles form when the steam tip sits too high or air enters too late. Introduce air early, then roll the milk so the bubbles become fine and integrated.
Can you make cappuccino without a steam wand?
Yes, as an approximation. Heat milk separately and use a French press or suitable frother to create fine mobile foam, then pour it promptly into concentrated coffee.